Out of the box, Salesforce Calendar has some useful features. This article highlights two of them: You can add another Calendar and you can add standard and custom object records according to dates on those records. It is possible to add Public Calendars and Resources too. Before this article, I had not needed to create one of these. So the last part of this post covers my exploration into Public Calendars.
Please note that this does not deal with Calendar Integrations such as Outlook or Google Calendar.
Adding another User’s Calendar
- Go to the Calendar tab.
- Click the cog next to Other Calendars to the bottom right of the Calendar page and click Add Calendar.

- Search for your colleague’s username in the Add Calendar box and click Add.
- Their username will appear in the Other Calendars list.
- To change the colour of their entry, click on the arrow next to their name and use the colour picker to change their entry.
- To temporarily turn off their calendar, click the coloured square in front of their name. Their calendar entries will disappear from your calendar view.
Adding a Standard or Custom Object as a Calendar entry
To add standard or custom object records by dates to the Calendar, follow the steps below. In order for this to work, you will need to set a few items on your custom object.
- Ensure you have at least one – preferably two – date and time fields for the Start date and time (and the End date and time).
- Create a list view from the Object that filters the records you wish to show in the calendar. This is a useful step, particularly if you want to show only a selection of all records by record type or picklist.
- Create a formula field that concatenates key information on the custom object into one field so that your Calendar entry is as useful to you as possible.
When you are ready follow these steps:
- Click the Cog next to My Calendar and choose New Calendar,
- The Create Calendar dialogue box will appear. Choose the Object you wish to create a calendar based on records of that object and click next.

- In step 2 of create Calendar,
- Add a Name for Calendar Name
- Choose a date or date/time field for “Field to Start”
- Optionally a date or date/time field for “Field to End”
- In “Apply a Filter” choose a List view. Note: List views with the scope My and All are supported as well as custom List Views created. However, list views with My Team scope are not supported
- In “Field Name to Display” choose the formula field you created that provides useful information for your calendar entries.

- Each Calendar entry will use those settings

- To change the colour of the Calendar entries (particularly if you have a few calendars), click on the arrow next to the Calendar name and use the colour picker.
From what I have found, each User needs to set their Calendars – or the System Administrator for them. Unless part of an App exchange product with a pre-configured calendar in the app (Advologix for example).
Public Calendars and Resources
Now into the fun part. It’s good to explore elements I have not yet used. 🙂
Public calendars are used predominantly to manage department or project schedules. Resource calendars can be used to manage resources such as conference rooms and projectors.
Public calendars and resources are created and activated from Setup.
- Go to Public Calendars and Resources and you can create both by clicking new.

- Name the Calendar and activate it.

- Click Save and then when created click Sharing. This is to ensure that it can be seen, edited and who by. The sharing access levels are as follows (using Salesforce’s own descriptions):
- Hide Details – Users can only see availability.
- Hide Details and Add Events – Users can see availability and add events.
- Show Details – Users can view the details of events, but they cannot add events or edit existing events.
- Show Details and Add Events – Users can view the details of events and add events, but they cannot edit existing events.
- Full Access – Users can view the details of events, add events, and edit existing events.
One final step is to go to Activity Settings in Setup and check the following two entries:
- Add user lists to calendar views in Lightning Experience
- Allow Users to Relate Multiple Contacts to Tasks and Events
When Public Calendars and Resources are first activated – they take a while to show. I looked at Classic and Lightning Experience to see how they both worked.
In Classic first:
- I went to home, and accessed the Calendar from there.

- I then clicked change and in the Lookup box changed from Users to Public Calendar and Resources.

- I selected the public calendar I wanted to view and then clicked the plus at the top of the calendar page to create a new event.
- When clicking new, the Assigned to Field allowed me to choose the public calendar rather than a User and I could fill in the details as normal.
- At the bottom of the event, there was an option to select invitees.

- From the Select Invitees section, I could choose users I wanted to invite to this event. Although the event would be there in the public calendar for people to view, the Invitees, can specifically add Users so that it appears in their own calendars as well as the Public Calendar.

- A benefit to this is that it also automatically sent me an email message about the event.

Once Set in Classic, I came to Lightning Experience and saw the event I had created show up as part of the Public Calendar and Resource and as a My Event (as I had added myself as an invitee).
In Lightning Experience:
- I clicked on the Calendar to create a new event.
- I changed the assigned user selector to a calendar and selected the public calendar. At this point I could only select a Public Calendar and not a Resource.
- I could not see any of the Invitee section in Lightning Experience, although could assign the event to the Public Calendar.

Here are my two events. The one Titled Tech Department was created in Classic (and I could assign to another User). It appears twice as it is in the Public Calendar (Minty green on the right) and My Events (pale Blue on the left). The Lightning Experience created event is the one Titled “This was created in Lightning”.
Where are the Invitees in Lightning Experience? Not to be defeated, I had a look at the Event Page Layout (no clues in Lightning Experience). It could be that this item is not as yet transferred to Lightning Experience. I reached out using Trailblazer Community Questions (see the question and comments here).
I used Dataloader.io on my developer edition org and looked at the objects that were linked to an event. This task could also have been carried out in Schema Builder.

The page layouts for the Events have Accepted, Declined, etc.

I exported the EventRelation as the most likely object that held my invitation and there was my invitee entry! My User was stored as the Relation ID, and it was possible to have an Account ID entered on the record. I looked at the Event Relation Object information on https://developer.salesforce.com. There it states:
“This object lets you add or remove invitees from an event and use the API to manage invitees’ responses to invitations. If Shared Activities is enabled, EventRelation can also represent other objects that are related to an event. EventRelation does not support triggers, workflow, or data validation rules.”
The Event Relation Object also supports Calls through the API (application programme interface), such as, create(), delete(), update(), upsert(), among others.
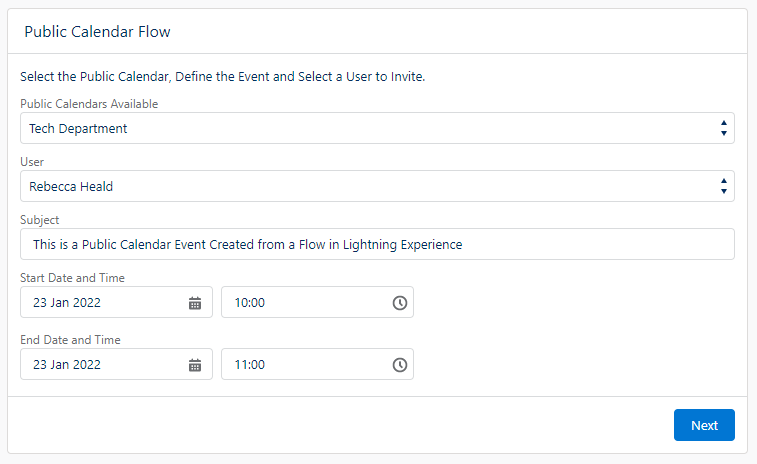
This gave me enough confidence to try to use a flow to create invitees to a Public Calendar. Here is the resulting flow:

The Screen Element gives the user the option to choose the Public Calendar, a User to add key event fields. For a real project, I would be enhancing User Experience by adding additional information and Event fields as well as the ability to add more than one User. As I am only exploring the possibility, this is sufficient for testing.
My flow successfully created an Event and an Event Relation. I did not receive the Meeting Request. Opening the event in Classic, I could click on a button to Save and Send Update when editing. Then I received the Meeting Request. So it looks light an Event Relation created through a flow does not send an invitation with a button enabling the User to Accept or Decline.
So I tested further by creating a Public Calendar event in Classic and adding myself as a User Invitee. The test entry’s subject was simply called Test! I did receive an email.

My thinking around this: To enable the email to be sent, we would need to have a further screen flow which enables Users to accept events to respond to them particularly if the Classic interface is not available to them.
I may add to this article over time. However, I leave you with some additional reading that is good to keep in mind: